Digital Signing
Sign New Key Pair
To create a new Key Pair and sign it using the currently selected Key Pair:
- Right-click on the signing Key Pair entry in the KeyStore Entries table. Select the Sign sub-menu from the pop-up menu and from that Sign New Key Pair.
- If required the Unlock Entry dialog will be displayed. Enter the Key Pair entry's password and press the OK button.
- From that point on it works like generating a Key Pair.
Sign a CSR
To sign a CSR using a Key Pair:
- Right-click on the signing Key Pair entry in the KeyStore Entries table. Select the Sign sub-menu from the pop-up menu and from that Sign CSR.
- If required the Unlock Entry dialog will be displayed. Enter the Key Pair entry's password and press the OK button.
- The Choose CSR dialog is displayed. Select the drive and folder of the CSR to be signed.
- Type the filename into the File Name text box.
- Click on the Choose button.
- The CSR's signature will be automatically verified. If valid the Sign CSR dialog is displayed. Review the CSR details.
- Select a Version and Signature Algorithm and enter a Validity Period and Serial Number.
- Use the Browse button to select a CA Reply File.
- Optionally, for version 3 CA Reply, add certificate extensions by clicking on the Add Extensions button.
- Press the OK button to commence signing and produce the CA Reply.
Sign a JAR
To sign a JAR using a Key Pair:
- Right-click on the signing Key Pair entry in the KeyStore Entries table. Select the Sign sub-menu from the pop-up menu and from that Sign JAR.
- If required the Unlock Entry dialog will be displayed. Enter the Key Pair entry's password and press the OK button.
- The Sign JAR dialog is displayed.
- Use the top Browse button to select an Input JAR to be signed.
- To output the signed JAR to a different file from the Input JAR uncheck the Sign Directly check box and use the bottom Browse button to select an Output JAR. Otherwise the Input JAR will be signed directly.
- Enter a Signature Name and select a Signature Algorithm and a Digest Algorithm.
- Click on the OK button to commence signing.
Sign a MIDlet
To sign a MIDlet using a Key Pair:
- Right-click on the signing RSA Key Pair entry in the KeyStore Entries table. Select the Sign sub-menu from the pop-up menu and from that Sign MIDlet.
- If required the Unlock Entry dialog will be displayed. Enter the Key Pair entry's password and press the OK button.
- The Sign MIDlet dialog is displayed.
- Use the top Browse button to select the Input MIDlet JAD to be signed.
- To output the signed JAD to a different file from the Input MIDlet JAD uncheck the Sign Directly check box and use the middle Browse button to select the Output MIDlet JAD. Otherwise the Input MIDlet JAD will be signed directly.
- Use the bottom Browse button to select the MIDlet JAR.
- Click on the OK button to commence signing.
Note: DSA Key Pairs cannot be used to sign MIDlets. Only RSA Key Pairs are supported for this purpose.
Sign a JWT
To create and sign a JWT (JSON Web Token) using a Key Pair:
- Right-click on the signing Key Pair entry in the KeyStore Entries table. Select the Sign sub-menu from the pop-up menu and from that Sign JWT.
- If required the Unlock Entry dialog will be displayed. Enter the Key Pair entry's password and press the OK button.
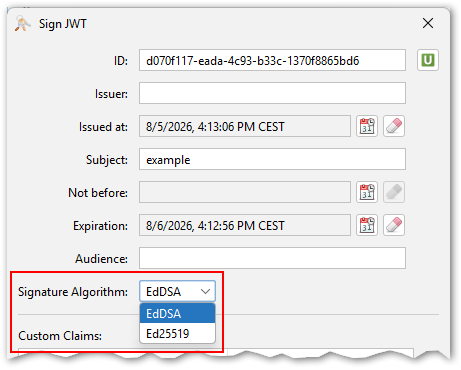
- The Sign JWT dialog is displayed.
- Fill in the claims to include: ID, Issuer, Subject, Issued at, Not before, Expiration and Audience, plus any additional custom claims.
- Select a Signature Algorithm.
- Click on the OK button to commence signing.
- The signed JWT is displayed in the View JWT dialog, from where it can be copied to the clipboard.
- Signing a JWT is only available for Key Pairs using RSA, one of the standard EC curves (P-256, P-384, P-521), Ed25519 or Ed448 — it is not available for ML-DSA or SLH-DSA post-quantum Key Pairs.
- For Ed25519 and Ed448 Key Pairs the Signature Algorithm choice lets you pick which algorithm name is written into the JWT's header: EdDSA (as defined by RFC 8037, the more widely compatible choice and the default) or the explicit Ed25519/Ed448 name (as defined by the newer RFC 9864, which deprecates EdDSA).
Sign a File (PKCS#7/CMS)
To sign an arbitrary file using a Key Pair, producing a PKCS#7/CMS signature:
- Right-click on the signing Key Pair entry in the KeyStore Entries table. Select the Sign sub-menu from the pop-up menu and from that Sign File.
- If required the Unlock Entry dialog will be displayed. Enter the Key Pair entry's password and press the OK button.
- The Sign File dialog is displayed.
- Use the top Browse button to select the Input File to be signed.
- Use the bottom Browse button to select the Output File the signature will be written to.
- Check Detached Signature to produce a detached signature that does not embed the input file, or leave it unchecked to produce an enveloped signature that embeds it.
- Check PEM to output the signature PEM encoded, otherwise it is written as binary DER.
- Select a Signature Algorithm.
- Optionally check Add Time stamp and select a TSA URL from the built-in list of well-known Time Stamping Authorities, or enter one manually, to timestamp the signature.
- To add the new signature as a counter signature to an existing PKCS#7 file instead of signing a new file, check Counter Sign and select the existing signature file as the Input File.
- Click on the OK button to commence signing.
Verify a JAR
To verify the signatures of a signed JAR file:
-
From the Tools menu, choose Verify JAR File Signature. Alternatively
click on the Verify JAR File Signature tool bar button:

- Select the JAR file to verify and press the Choose button.
-
The Signature Details dialog will appear, listing for each file in the JAR its name, size, date and
verification flags, similar to the output of the
jarsigner -verifycommand. - Use the buttons on the dialog to show further details of the signature(s) — a JAR may have more than one — and the certificates involved.
- After reviewing the details close the dialog by pressing the OK button.
The verification flags shown for each file are:
- s the entry's signature was verified.
- m the entry is listed in the manifest.
- k at least one of the entry's certificates was found in the current KeyStore.
Verify a File (PKCS#7/CMS)
To verify a PKCS#7/CMS signature:
- From the Tools menu, choose Verify PKCS#7/CMS Signature.
- Select the PKCS#7/CMS signature file to verify and press the Choose button.
- If the signature is a detached signature, a further dialog will be shown to also select the original content file, if it cannot be found automatically.
- The Signature Details dialog will appear with the details of the signature(s) and certificate(s) found in the file.
- After reviewing the details close the dialog by pressing the OK button.